Posted on 2023-04-26
Recently I had to reinstall Linux because of reasons, and I hit a bit of a snag. See, my computer has this setup with three drives where one is the boot drive, and the other has /home on it... it's not important, point is, I wanted some drives to be automatically mounted as specific directories at boot time.
This is pretty easy to do with the manual partitioning tools most graphical installers provide, but I would have also had to manually partition the boot drive and hell if I'm figuring out for the umpteenth time how this particular distro with this particular hardware needs to be partitioned in order to be bootable, so I just selected the automatic partitioning option which assumes you just want everything on the boot drive.
Now the problem is that my system doesn't know my /home directory is on /dev/sda3 and not /dev/nvme0n1p1. So I have to fix that now or just log in as root and mount my shit every time I turn the computer on for the rest of time. Guess which thing sounded like more of a pain in the ass. I googled it so you don't have to!
I recommend you log out and do this as root in a TTY if you intend to mount something as your home directory.
First, run:
sudo blkid
This will return a list of block devices (partitions) your system sees with some information about each, like this:
      sudo blkid
      /dev/sda1: UUID="YOUR_UUID" BLOCK_SIZE="4096" TYPE="YOUR_TYPE" PARTUUID="30aac87d-21c9-44a9-8033-108eede77f8b"
You'll probably have more than one though. There should be one per partition your system can see. We're interested in the UUID and TYPE attributes. Find the ones for the partition you want mounted and take note of them. We'll be adding these to your fstab file.
Make a backup of your fstab file in case you break things! You can do this by simply copying the file:
sudo cp /etc/fstab /etc/fstab.bak
Now we can edit it. Open /etc/fstab in your favorite text editor, and you should be greeted with a file that looks something like this:
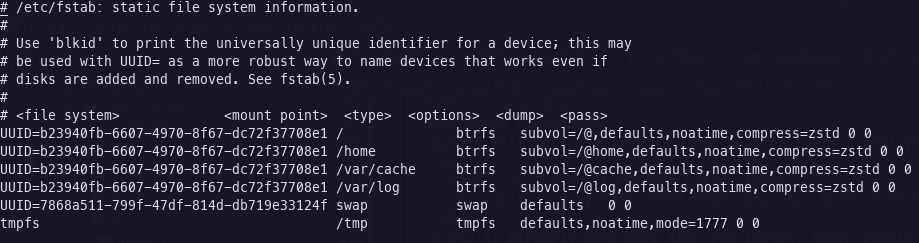
(This is the fstab file EndeavourOS generated on install. Because I set it to use btrfs, it mounted the same partition like four separate times as subvolumes. Yours will likely be smaller if you didn't do this.)
This information tells your system which partitions should be mounted and at which locations to mount them, as well as some other settings. We don't need to worry about most of it, though. Simply append a line for your partition to the file:
      /etc/fstab
      #imagine the contents of your fstab file here

      UUID=YOUR_UUID /path/to/mountpoint YOUR_TYPE defaults 0 0
For example, here's the entry I added for one of my drives:
      /etc/fstab
      UUID=f8c3f1b1-7fef-4a01-bec7-ba3e89e2f8da /home/willem/vault ext4 defaults 0 0
If you did it right, you should now be able to reboot and see your partitions have been automatically mounted!
One more thing to keep in mind, if you see any lines with a mount point that's the same as the place you're trying to mount to (for example, the system has mounted a btrfs subvolume for /home and you want to put that on your secondary drive) you should probably comment out or delete that.
Alternatively, you could just paste this into your terminal and then reboot:
partition="/dev/yourpartition"; directory="/path/to/mountpoint"; sudo cp /etc/fstab /etc/fstab.$(date +%s).bak; echo "UUID=$(sudo blkid $partition | sed "s/^.* UUID=\"//;s/\".*//") $directory $(sudo blkid $partition | sed "s/^.* TYPE=\"//;s/\".*//") defaults 0 0" | sudo tee -a /etc/fstab
But don't complain to me if you break your system doing that.